Multi surface Paint: Blue, Light Green, Black, White, Red, Orange, and Yellow
Cup and Water
Paper Towels or Shop Towels
Paint brushes
Flat Brush (1/2″ to 1″)
Fine Brush (Round or Liner)
STEPS
Detach the light fixture that is inside the lantern by first unscrewing the entire fixture from where it is attached to the rest of the lantern at the top of the main stem inside the lantern. You will then have to slowly work it out from the open bottom of the lantern by turning the individual light bulb holders so that they are outside of the lantern area.
Once the light fixture is outside of the lantern, you will need to slowly pull any wire that is attached to it through the lantern and out the other end. You might have to untangle it from the chain that was used to hang the light as you do so.
Unscrew the very top part of the lantern where the chain is attached and replace it with the bottom piece of the light fixture.
Wash your lantern with Windex and water to prepare the surface for painting. You can dispose of the parts you took out or save them for use in future projects.
Use the instructions below for inspiration on what to paint on your autumn lantern.
Once you are done painting, allow the paint to dry then spray the lantern with a sealer to protect your new beautiful autumn artwork.
You can now use your lantern as a standalone decorative piece, part of a floral arrangement, or you can reattach the chain and hang it as artwork. Have fun exploring the possibilities!
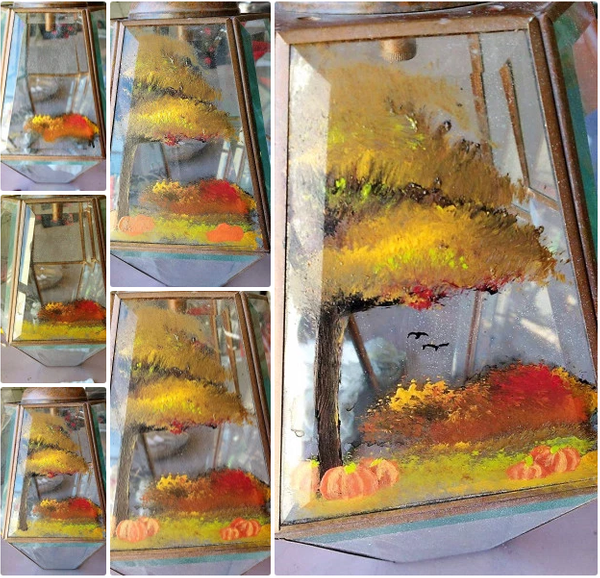
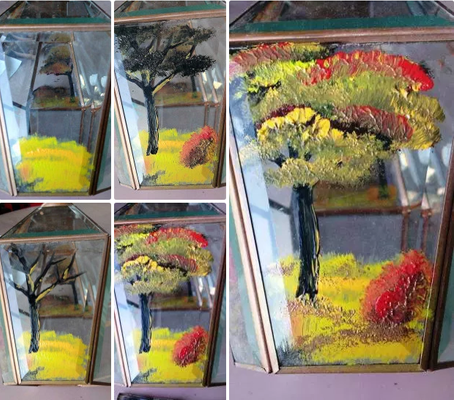
Tree With Pumpkins
Use the black paint and the flat brush to create some distant tree shapes by tapping the brush at an upwards angle about 1/4 of the way above the bottom of the glass panel. Be sure to vary the height and pressure to indicate different trees.
Wash and dry your brush, then dip it in a small amount yellow and do the same tapping motion over a small area of the place you painted black. Then dip your brush in the red paint and do the same thing. Be sure to still leave some black showing to indicate shadows. Also, don’t wash your brush between colors here, as the colors mixing on the brush is what will make it look like you have a wide array of fall leaf colors in your trees.
Wash and dry your flat brush, then add some yellow paint to it and use very short, straight tapping motions going left to right to make some grass. Each time you run out of paint on the brush, add green to it. This way you’ll have some variation in the colors that show up in the grass.
Use your fine brush and some black paint to create a thick vertical line that goes about halfway up the glass pane. Then, create branches coming off the tree by painting multiple “v” shapes at the top of each branch or trunk. Make some highlights on your trunk and larger branches by adding a thin stripe of yellow paint at the edge. Don’t be too particular about the details here as we will be covering up most of the branches.
Use the same technique you used with the distant trees to make the leaves on your tree in the foreground. We also added a touch of green as well as the yellow and red to tie the colors of the tree into the colors in the grass.
Use the orange paint and your fine brush to create oval pumpkins at the base of your tree and in the grass.
Add a bit of red or black to your orange and use that color on any pumpkins that are behind other pumpkins to create shadows and separate them.
Add a bit of white to your base orange you used to create the pumpkins and use this color to make lines that follow the contours of the pumpkins. These are your highlights.
Use your fine brush and green paint to make short stems at the top of the pumpkins.
If you would like, wash your fine brush and add black paint to it, then create small “m” shapes to add some birds that are flying in the distance.
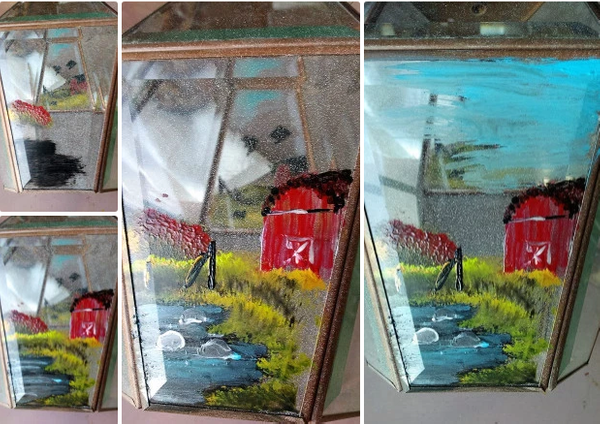
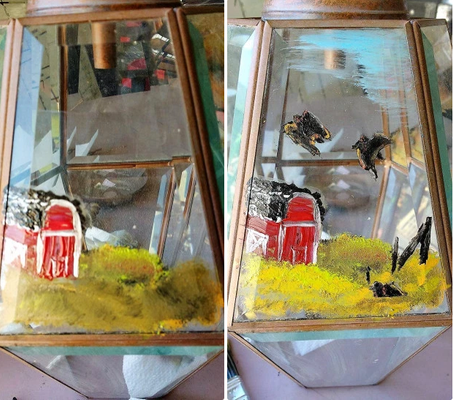
Barn and Pond
Add some red and green to your flat brush, and tap your brush while angling it slightly upwards to create some distant trees about halfway up your glass pane.
Wash and dry your flat brush, then use black paint and horizontal strokes to create a pond shape on the left side of your pane. Let the pond go off of the pane.
Add some blue and white to your flat brush and go over the black until it is a color that more closely resembles water. Be sure to still leave some black showing though.
Wash and dry your flat brush then add black, yellow, and green to it. Then, starting from just below your distant trees, tap in a short, upwards motion while moving your brush horizontally, then slightly downwards to create a hill shape. Be sure that with each new layer of grass you are following the contours of the one above it.
Use red paint and your fine brush to draw vertical lines that make a filled in upside-down U shape near the right side of the glass pane. These lines will indicate the boards of the front of a barn.
Use black paint and your fine brush to make the roof of your barn. Make sure that the line for the top of the roof is tilted slightly upwards to create the illusion of distance. Use the brush to make small dots to indicate roof shingles.
Use the fine brush and white paint to make the barn door and trim.
Add black paint to the brush and draw two vertical lines near the pond to create a broken fence. Draw one more line that is leaning up against one of your posts to make another piece of the broken fence.
Mix your black and white paint to make a grey color, then use that color with your fine brush to make some half-circle rock shapes in the water. Then add white to the brush and make highlights on the tops of the rocks and at their bases where they touch the water.
If you would like, add a dab of blue to the top right corner of your glass pane, then use a clean flat brush to blend the blue outwards, creating the illusion of a blue sky while still letting some of the glass show.
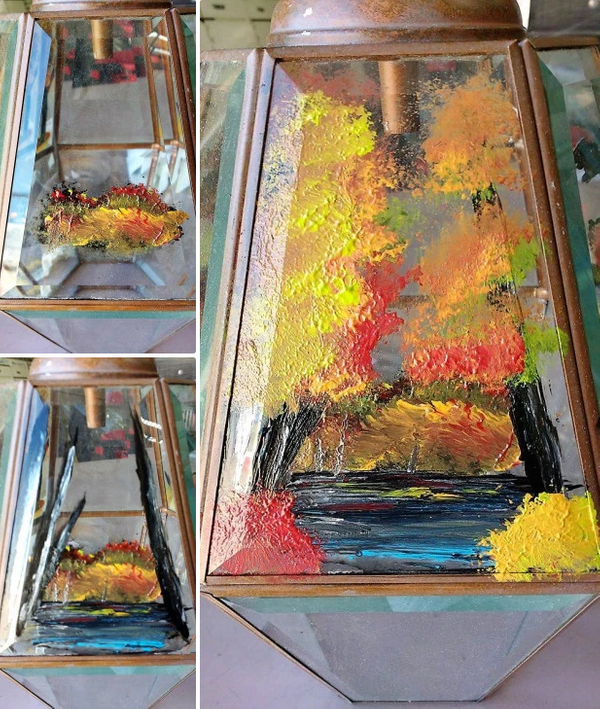
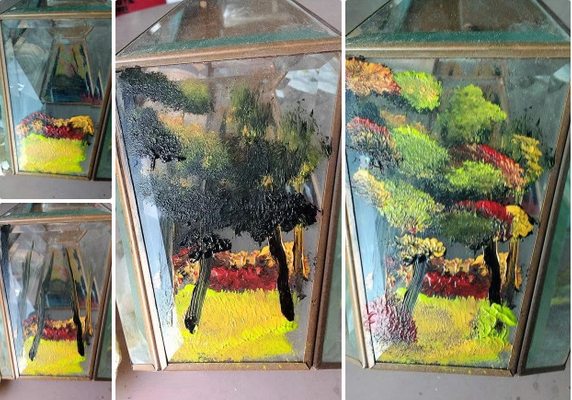
Forest Lake
Do steps 1 and 2 from the Tree and Pumpkin tutorial to create some distant trees. In this example, we added some green to the trees as well to add interest.
Wash your flat brush, then dip it in black paint and paint a horizontal line right below your distant trees. This will be your water line. Then dip your brush in blue paint and lightly brush it along the foreground to make the water there a bit bluer.
Use your fine brush to make small horizontal white and blue lines in your water to indicate waves. Then wash it and add the colors you used in the background tress. Add waves with these colors near where the water meets the trees.
Draw some thick vertical lines with black paint and your fine brush near the left and right sides of the panes. Make sure these lines taper towards the top.
Add some white highlights to your tree trunks.
Use the same technique you used to create the distant trees to make the leaves on the trees in the foreground. If one tree is behind another, work from back to front and be sure to make the background tree’s leaves a different color so that the trees can be told apart.
Add some bushes to the base of your trees by using the same technique you used to make the tree leaves.